Over the past few months I’ve been working on a WebGL visualization of earth’s solar neighborhood — that is, a 3D map of all stars within 75 light years of Earth, rendering stars and (exo)planets as accurately as possible. In the process I’ve had to learn a lot about WebGL (specifically three.js, the WebGL library I’ve used). This post goes into more detail about how I ended up doing procedural star rendering using three.js.
The first iteration of this project rendered stars as large balls, with colors roughly mapped to star temperature. The balls did technically tell you where a star was, but it’s not a particularly compelling visual:

Pretty much any interesting WebGL or OpenGL animation uses vertex and fragment shaders to render complex details on surfaces. In some cases this just means mapping a fixed image onto a shape, but shaders can also be generated randomly, to represent flames, explosions, waves etc. three.js makes it easy to attach custom vertex and fragment shaders to your meshes, so I decided to take a shot at semi-realistic (or at least, cool-looking) star rendering with my own shaders.
Some googling brought me to a very helpful guide on the Seeds of Andromeda dev blog which outlined how to procedurally render stars using OpenGL. This post outlines how I translated a portion of this guide to three.js, along with a few tweaks.
The full code for the fragment and vertex shaders are on GitHub. I have images here, but the visuals are most interesting on the actual tool (http://uncharted.bpodgursky.com/) since they are larger and animated.
Usual disclaimer — I don’t know anything about astronomy, and I’m new to WebGL, so don’t assume that anything here is “correct” or implemented “cleanly”. Feedback and suggestions welcome.
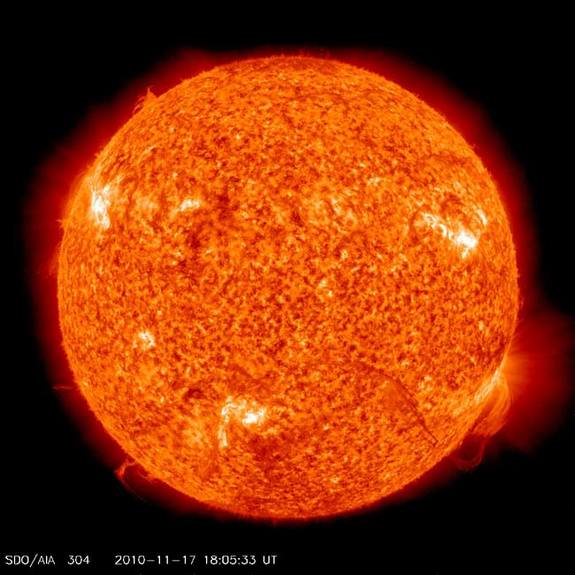
My goal was to render something along the lines of this false-color image of the sun:
In the final shader I implemented:
- the star’s temperature is mapped to an RGB color
- noise functions try to emulate the real texture
- a base noise function to generate granules
- a targeted negative noise function to generate sunspots
- a broader noise function to generate hotter areas
- a separate corona is added to show the star at long distances
Temperature mapping
The color of a star is determined by its temperature, following the black body radiation, color spectrum:

(sourced from wikipedia)
Since we want to render stars at the correct temperature, it makes sense to access this gradient in the shader where we are choosing colors for pixels. Unfortunately, WebGL limits the size of uniforms to a couple hundred on most hardware, making it tough to pack this data into the shader.
In theory WebGL implements vertex texture mapping, which would let the shader fetch the RGB coordinates from a loaded texture, but I wasn’t sure how to do this in WebGL. So instead I broke the black-body radiation color vector into a large, horrifying, stepwise function:
bool rbucket1 = i < 60.0; // 0, 255 in 60 bool rbucket2 = i >= 60.0 && i < 236.0;  //   255,255
…
float r =
float(rbucket1) * (0.0 + i * 4.25) +
float(rbucket2) * (255.0) +
float(rbucket3) * (255.0 + (i - 236.0) * -2.442) +
float(rbucket4) * (128.0 + (i - 288.0) * -0.764) +
float(rbucket5) * (60.0 + (i - 377.0) * -0.4477)+
float(rbucket6) * 0.0;
Pretty disgusting. But it works! The full function is in the shader here
Plugging in the Sun’s temperature (5,778) gives us an exciting shade of off-white:

While beautiful, we can do better.
Base noise function (granules)
Going forward I diverge a bit from the SoA guide. While the SoA guide chooses a temperature and then varies the intensity of the texture based on a noise function, I instead fix high and low surface temperatures for the star, and use the noise function to vary between them. The high and low temperatures are passed into the shader as uniforms:
 var material = new THREE.ShaderMaterial({
   uniforms: {
     time: uniforms.time,
     scale: uniforms.scale,
     highTemp: {type: "f", value: starData.temperatureEstimate.value.quantity},
     lowTemp: {type: "f", value: starData.temperatureEstimate.value.quantity / 4}
   },
   vertexShader: shaders.dynamicVertexShader,
   fragmentShader: shaders.starFragmentShader,
   transparent: false,
   polygonOffset: -.1,
   usePolygonOffset: true
 });
All the noise functions below shift the pixel temperature, which is then mapped to an RGB color.
Convection currents on the surface of the sun generate noisy “granules” of hotter and cooler areas. To represent these granules an available WebGL implementation of 3D simplex noise. The base noise for a pixel is just the simplex noise at the vertex coordinates, plus some magic numbers (simply tuned to whatever looked “realistic”):
void main( void ) {
float noiseBase = (noise(vTexCoord3D , .40, 0.7)+1.0)/2.0;
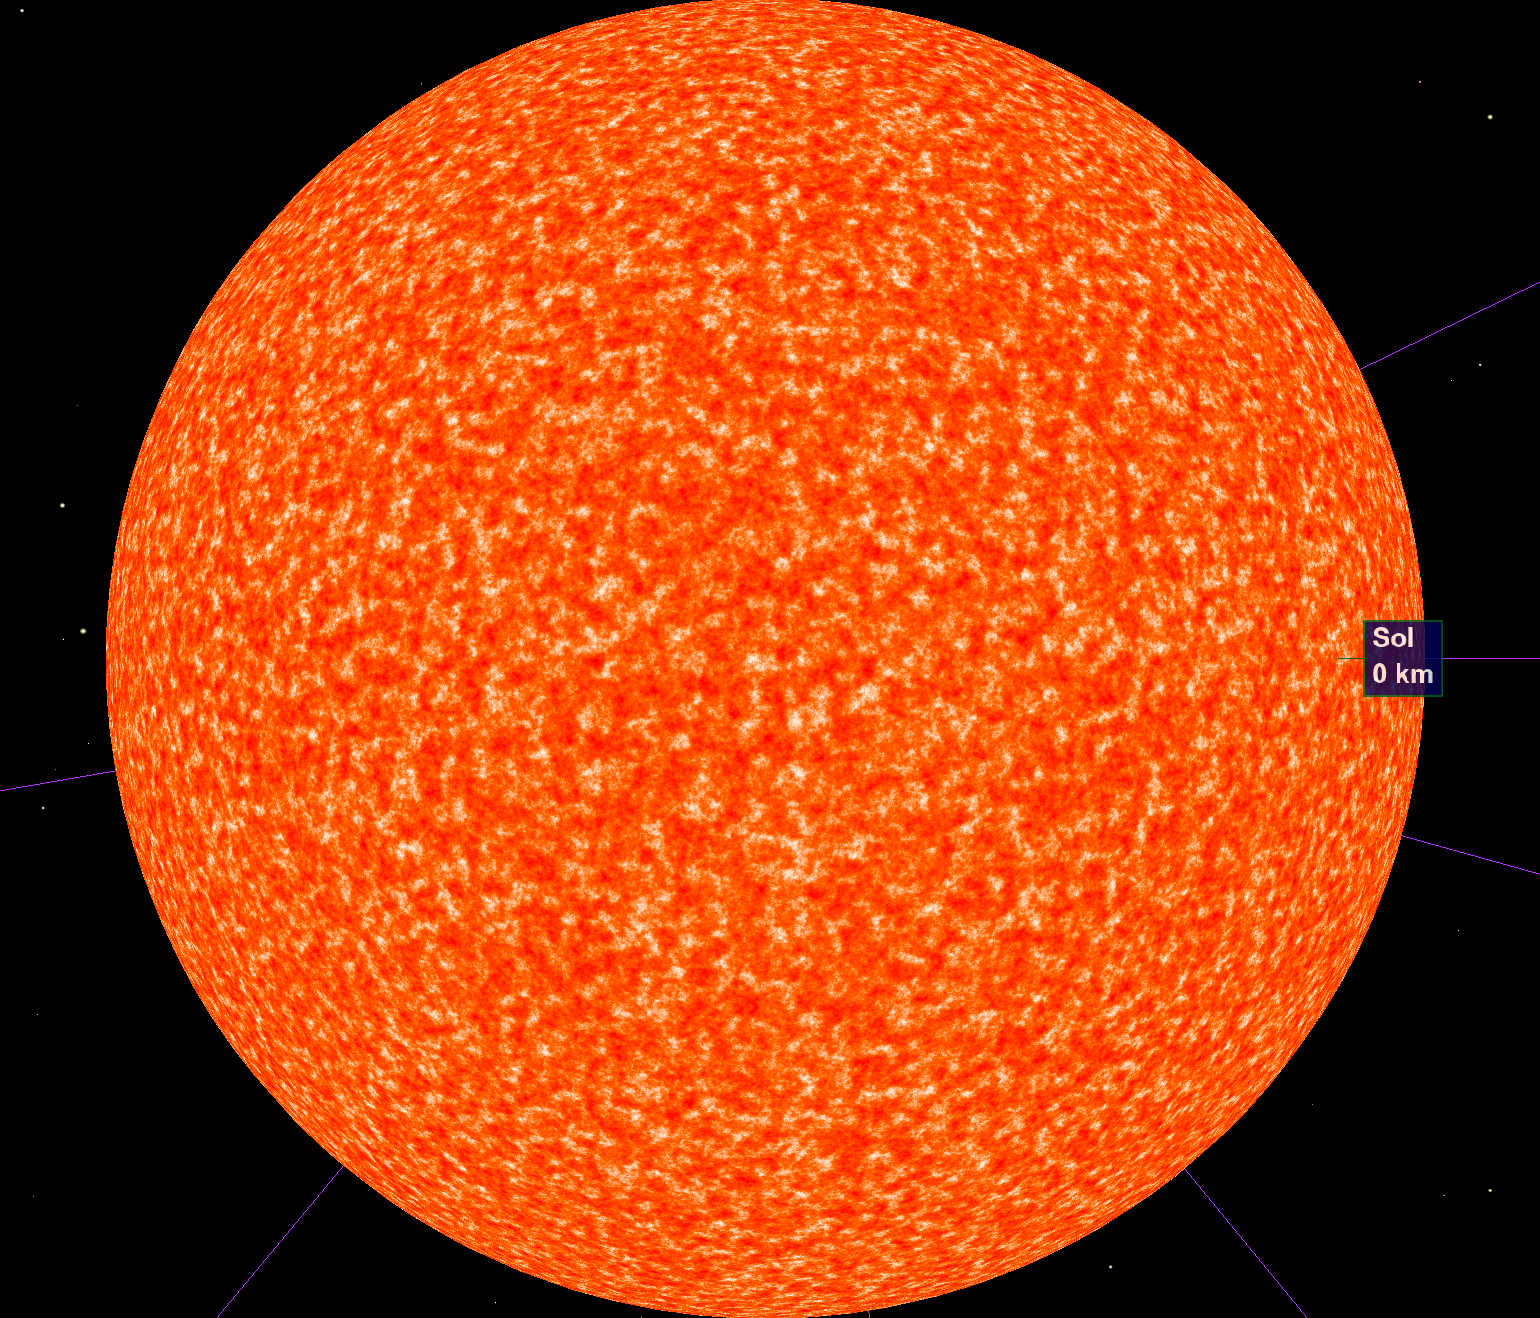
The number of octaves in the simplex noise determines the “depth” of the noise, as zoom increases. The tradeoff of course is that each octave increases the work the GPU computes each frame, so more octaves == fewer frames per second. Here is the sun rendered at 2 octaves:

4 octaves (which I ended up using):
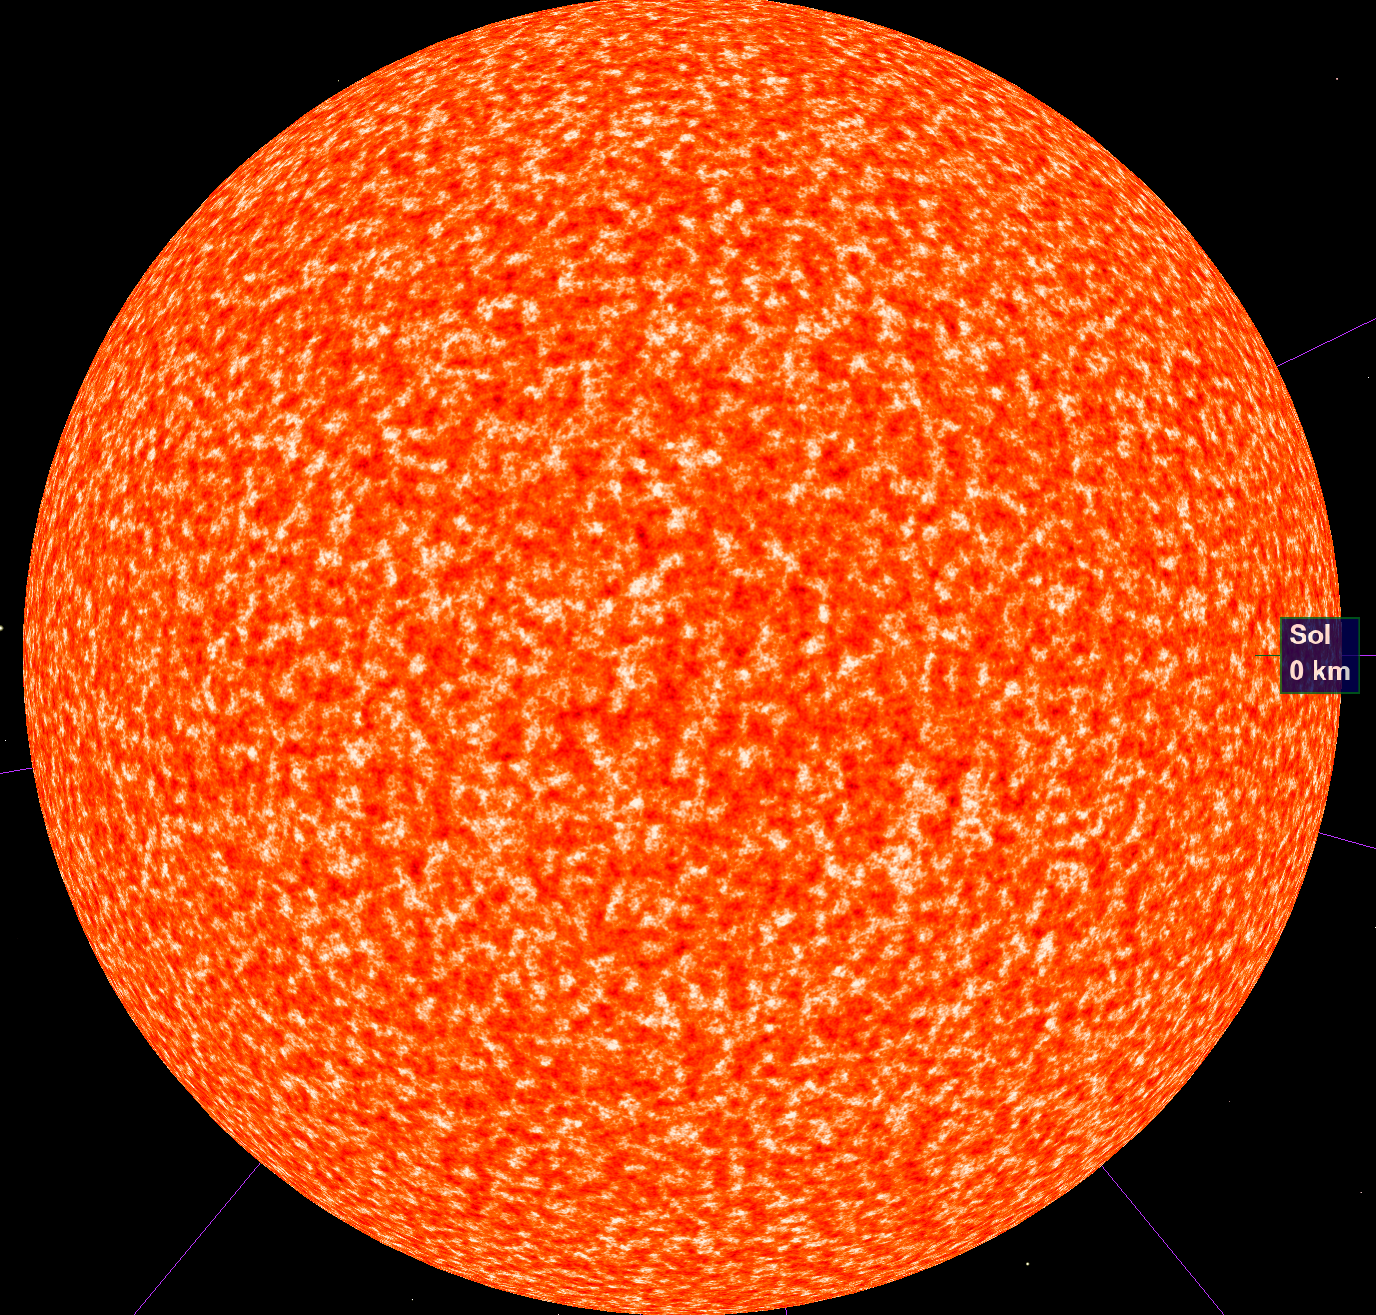
and 8 octaves (too intense to render real-time with acceptable performance):
Sunspots
Sunspots are areas on the surface of a star with a reduced surface temperature due to magnetic field flux. My implementation of sunspots is pretty simple; I take the same noise function we used for the granules, but with a decreased frequency, higher amplitude and initial offset. By only taking the positive values (the max function), the sunspots show up as discrete features rather than continuous noise. The final value (“ss”) is then subtracted from the initial noise.
float frequency = 0.04;
float t1 = snoise(vTexCoord3D * frequency)*2.7 -  1.9;
float ss = max(0.0, t1);
This adds only a single snoise call per pixel, and looks reasonably good:

Additional temperature variation
To add a bit more noise, the noise function is used one last time, this time to add temperature in broader areas, for a bit more noise:
float brightNoise= snoise(vTexCoord3D * .02)*1.4- .9;
float brightSpot = max(0.0, brightNoise);

float total = noiseBase - ss + brightSpot;
All together, this is what the final shader looks like:

Corona
Stars are very small, on a stellar scale. The main goal of this project is to be able to visually hop around the Earth’s solar neighborhood, so we need to be able to see stars at a long distance (like we can in real life).
The easiest solution is to just have a very large fixed sprite attached at the star’s location. This solution has some issues though:
- being inside a large semi-opaque sprite (ex, when zoomed up towards a star) occludes vision of everything else
- scaled sprites in Three.js do not play well with raycasting (the raycaster misses the sprite, making it impossible to select stars by mousing over them)
- a fixed sprite will not vary its color by star temperature
I ended up implementing a shader which implemented a corona shader with
- RGB color based on the star’s temperature (same implementation as above)
- color near the focus trending towards pure white
- size was proportional to camera distance (up to a max distance)
- a bit of lens flare (this didn’t work very well)
Full code here. Lots of magic constants for aesthetics, like before.
Close to the target star, the corona is mostly occluded by the detail mesh:

At a distance the corona remains visible:

On a cooler (temperature) star:

The corona mesh serves two purposes
- calculating intersections during raycasting (to enable targeting stars via mouseover and clicking)
- star visibility
Using a custom shader to implement both of these use-cases let me cut the number of rendered three.js meshes in half; this is great, because rendering half as many objects means each frame renders twice as quickly.
Conclusions
This shader is a pretty good first step, but I’d like to make a few improvements and additions when I have a chance:
- Solar flares (and other 3D surface activity)
- More accurate sunspot rendering (the size and frequency aren’t based on any real science)
- Fix coronas to more accurately represent a star’s real visual magnitude — the most obvious ones here are the largest ones, not necessarily the brightest ones
My goal is to follow up this post a couple others about parts of this project I think turned out well, starting with the orbit controls (the logic for panning the camera around a fixed point while orbiting).

Holy moly, your post is exactly what I was looking for to improve my project!
I’m building a universe generator for people to build their own spacefaring civ and explore. Especially the raycasting is a pain.
Thank you so much for this. 🙂
Glad you found it useful!
Very much so!
I was wondering how to deal with the sprite raycasting problem for a while as well as seeing if I could speed up the rendering and consistency of stars somehow. My stars were pretty much based on the 100000 stars chrome project.. and weren’t very good. I’m very much a noob when it comes to shaders. 🙂
I’m also working on a stand-alone AngularJS/Socket.IO framework that’ll be for ThreeJS projects in general and am using that as a base for my application.
I’m going to have to add shader support to that as well. 🙂 At the moment I’m just loading them directly through script tags in the main HTML.. which is exceedingly ugly.
Thanks Ben! I took the liberty to turn the sun part to a CodePen:
https://codepen.io/dirkk0/pen/MWxZLeB
This is cool! Thank you.